Preparing Devices for a Network Connection

Each IP Link® device must have its IP address set before it is usable on an A/V network. There are three ways to set an IP address:

Add Device > Auto Config IP

Note:  The IP Link device must be:

  1. physically connected to the network,

and

  1. at its factory default IP address (192.168.254.254) for this procedure to work. See the device user guide for instructions on resetting the device to its factory default condition.

  1. From the Edit menu, select Add Device.

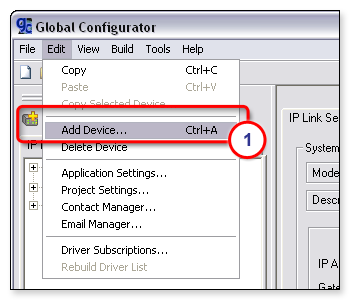
 - or -

Click the Add Device icon on the toolbar.


The Add Device dialog box (shown below) opens.

  1. Select the new device type from the IP Link Device drop-down list.

  2. In the Name/IP Address field, enter the device IP address.

  3. In the Display Name field, enter a unique device name.

  4. Select the Make this device a GlobalViewer® Host check box if desired (see the note below).

  5. Click the Advanced button. The advanced options of the Add Device dialog box are displayed.

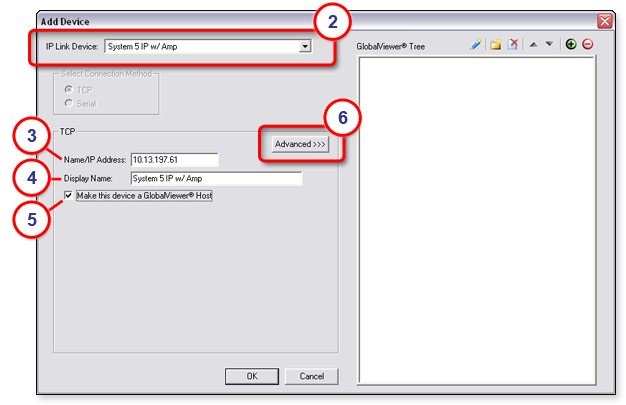
Note:  A GlobalViewer host is a device that launches the GlobalViewer interface if its IP address is accessed in an Internet browser. A device that is not  designated as a GlobalViewer host can be monitored and controlled from any GlobalViewer host device on the same A/V network.
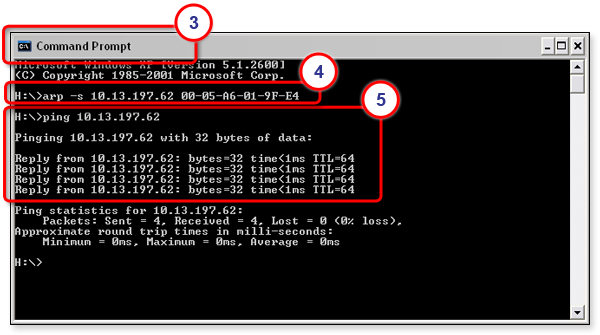
  1. Select the Auto Configure IP Address check box.

  2. Enter the MAC address of the device (found on a label on the rear panel of the device). The first six digits are common to all Extron devices (00-05-A6), and are pre-populated. Dashes are entered automatically. It is only necessary to enter the final six digits of the MAC address.

  3. Click Set. The Auto Configure Successful dialog box opens.

  1. Click OK.

Address Resolution Protocol (ARP)

The ARP command assigns a given IP address to a device with a specified MAC address.

Note:  The IP Link device must be at its factory default IP address (192.168.254.254) for this procedure to work. See the device user guide for instructions on resetting the device to its factory default condition.  

To use the ARP command:

  1. Obtain a valid IP address from your system administrator.

  2. Locate and record the MAC address from the label on the rear panel of the IP Link device.

  3. Open the Command Prompt window on a PC that is on the same network as the device.  

To do so:

From the desktop, click the Start button and select All Programs > Accessories > Command Prompt.

  1. At the command prompt, type:

arp -s <IP address> <MAC address>

Example:

C:\>arp -s 10.13.197.62 00-05-A6-01-9F-E4

This command assigns IP address 10.13.197.62 to the device that has a MAC address of
00-05-A6-01-9F-E4.

  1. Execute a ping command to the new IP address. Type:

ping <IP address>

Example:    

C:\>ping 10.13.197.62

If the IP address setting was successful, the device replies three or more times with:

Reply from <IP address>: bytes=32 time<1ms TTL=64
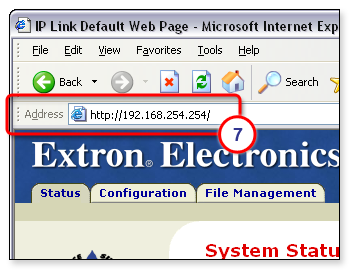
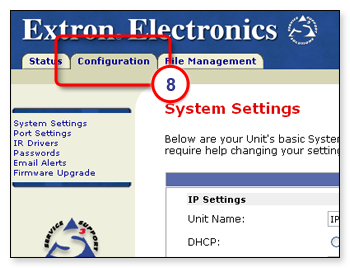
Embedded Web Pages

Note:  The IP Link device must be at its factory default IP address (192.168.254.254) for this procedure to work. See the appropriate user guide for instructions on resetting the device to its factory default condition.

To set an IP address using the embedded web page:

  1. Obtain a valid IP address from your system administrator.

  2. Connect a CAT 5 Ethernet crossover cable between the device and a PC.

  3. On the PC, locate the Internet Protocol (TCP/IP) Properties dialog box.

On Windows® XP:

  1. From the desktop, click Start.

  2. Right-click My Network Places and select Properties.

  3. Right-click Local Area Connection and select Properties.

  4. Select Internet Protocol (TCP/IP) in the list.

  5. Click Properties.

  1. Record the current IP address, subnet mask, and default gateway settings. You will need this information later to return your PC to its original settings.

  2. Enter (as shown at right):

  3. IP address: 192.168.254.253

  4. Subnet mask: 255.255.0.0

  5. Default gateway: <empty>


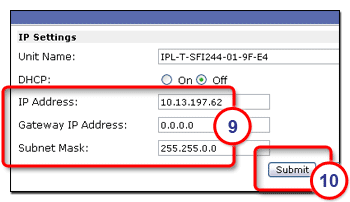
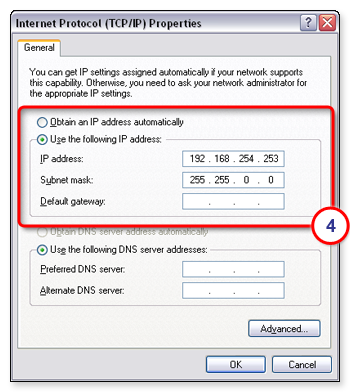
Note:  When a valid IP address is entered, the Subnet mask field may default to 255.255.255.0. Be sure to change it to 255.255.0.0.

  1. Open a web browser.

  2. Enter 192.168.254.254 in the Address field of the browser and press <Enter> on the keyboard. This displays the embedded web page of the IP Link device.

  1. Click the Configuration tab.

  1. Update the IP address and subnet mask to the new IP address and subnet mask.

  2. Click Submit.

The new IP address is written to the device and the web browser connection is immediately lost.

The device, with its new IP address, is now ready to be connected to your A/V network.

Return PC to original settings

  1. Close the web browser.

  2. Disconnect the Ethernet crossover cable from the PC and the device.

  3. Return to the Internet Protocol (TCP/IP) Properties dialog box on the PC.

  4. Return the IP address, Subnet mask, and Default gateway fields to their original settings.

Note:  If the original PC setting was Obtain an IP address automatically, return to this setting and leave the other fields blank.

  1. Reboot the PC.